Save
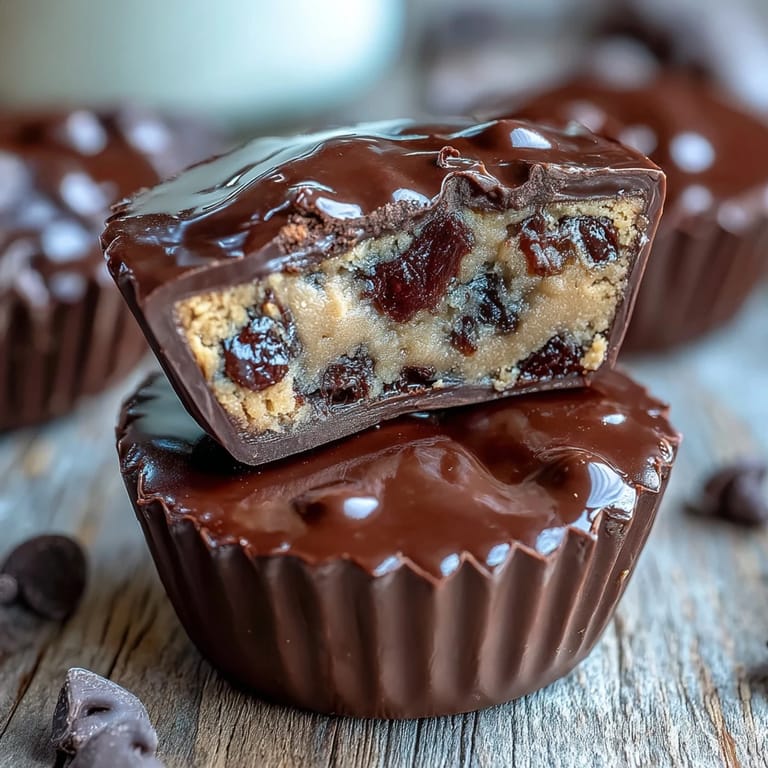
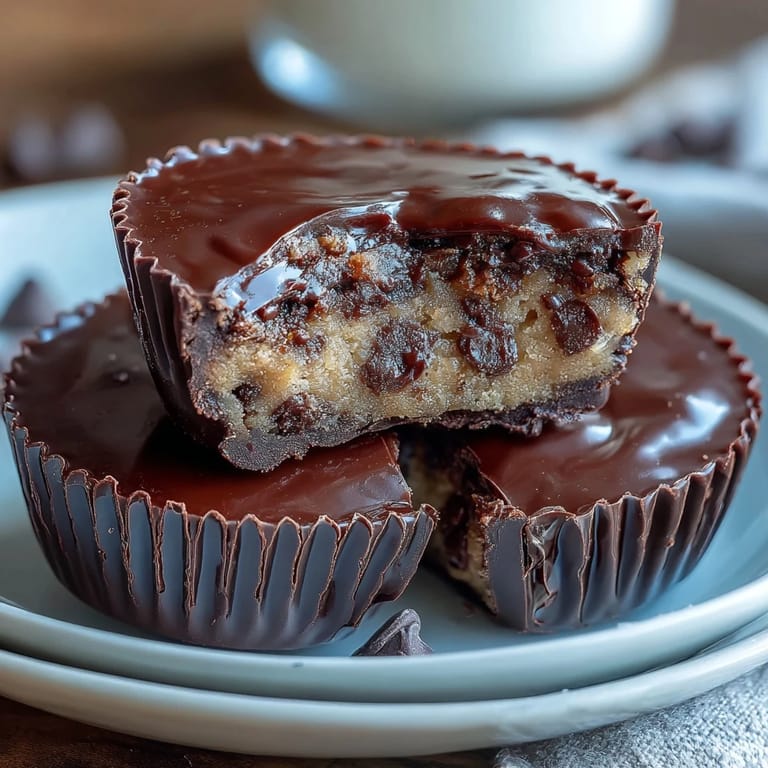
Save There's a specific moment I'll never forget: standing in my kitchen on a Tuesday afternoon, craving both warm cookie dough and the smooth richness of a peanut butter cup, and thinking, why choose? That's when I started layering these three obsessions together, pressing cookie dough into melted chocolate and peanut butter like I was building the ultimate dessert sandwich. My roommate walked in halfway through, saw the mess of chocolate on my hands, and immediately asked for one before I'd even finished the first batch. These homemade peanut butter cups became the thing I'd make whenever someone needed convincing that homemade was worth the extra effort.
I made these for a potluck where everyone was bringing store-bought desserts, and I'll admit I was nervous—homemade always feels like it has more to prove. But the moment people bit into them, the conversation stopped. Someone asked if I'd bought them from a fancy chocolatier, and I had to laugh because they were sitting in my kitchen an hour earlier. That's when I realized these weren't just good; they were the kind of dessert that makes people feel seen because you actually took the time.
Ingredients
- Unsalted butter (1/4 cup for dough, 2 tbsp for peanut butter layer): The butter is what keeps this dough tender and reminds it that it's supposed to feel indulgent, not gritty or dry.
- Light brown sugar and granulated sugar: Together they create a depth of flavor that plain sugar can't achieve, with just a hint of molasses undertone.
- Heat-treated all-purpose flour: This is non-negotiable for food safety when eating raw dough, and microwave-treating it takes only a minute and doesn't change the flavor at all.
- Mini chocolate chips: Use the smallest ones you can find because they distribute through the dough like little flavor bursts instead of heavy chunks.
- Creamy peanut butter: The kind that spreads easily is your friend here; natural peanut butters with separated oil can make the layer greasy.
- Powdered sugar: This sweetens the peanut butter layer without adding moisture, keeping it stable as it sets.
- Semisweet or milk chocolate chips: Don't skip the coconut oil because it thins the chocolate just enough to coat smoothly without becoming watery, and it adds a subtle richness.
- Coconut oil or vegetable oil: Two teaspoons might sound small, but it's the difference between chocolate that coats like silk and chocolate that cracks.
Tired of Takeout? 🥡
Get 10 meals you can make faster than delivery arrives. Seriously.
One email. No spam. Unsubscribe anytime.
Instructions
- Prepare your cookie dough canvas:
- Cream the softened butter with both sugars until you see soft peaks and the mixture looks almost fluffy, which takes about two minutes with a mixer but feels longer if you're doing it by hand. Once vanilla and milk are mixed in, fold in your heat-treated flour gently—this isn't bread dough, so you're not trying to develop gluten, just combine everything until the flour disappears into butter-colored dough.
- Fold in the chocolate chips:
- Use a spatula to scatter the mini chips across the surface and fold them in with gentle sweeps from the bottom of the bowl, which keeps them distributed evenly instead of sinking to the bottom. Chill this dough in the fridge while you move on to the chocolate, which actually makes it easier to scoop later.
- Prepare your muffin tin:
- Line each cup with a paper liner, pressing it down gently so it sits flat and won't slip when you add warm chocolate. This setup takes two minutes and saves you from wrestling with unmolding later.
- Melt your chocolate slowly:
- Microwave the chocolate chips and coconut oil in thirty-second bursts, stirring between each one, because chocolate can go from smooth to seized in seconds if you're not paying attention. When the chocolate looks almost melted with a few small chunks remaining, stop and stir—the residual heat will finish the job.
- Create the chocolate base:
- Spoon about one tablespoon of melted chocolate into each liner and use your finger or the back of a spoon to tilt and nudge it up the sides, creating a thin, even shell that covers the bottom and reaches about halfway up the sides. This is easier than it sounds because the chocolate wants to coat evenly if you let it.
- Freeze the chocolate base:
- Pop the muffin tin into the freezer for ten minutes while you make the peanut butter mixture, which gives the chocolate a firm foundation so the next layers won't sink or slide around.
- Mix the peanut butter layer:
- Stir the peanut butter, melted butter, powdered sugar, and salt together until completely smooth and uniform in color, which means all the sugar has dissolved and everything is holding together as one rich, creamy mass. This layer should be thick enough to stay in place but soft enough to spread slightly.
- Add the peanut butter to frozen chocolate:
- Remove the tin from the freezer and drop a heaping teaspoon of peanut butter mixture onto the chocolate in each cup, then use your spoon or a small offset spatula to gently flatten it into an even layer without pressing so hard that you crack the chocolate underneath. You're creating a platform for the cookie dough, so it doesn't have to be perfect, just present.
- Press in your cookie dough:
- Scoop about one teaspoon of chilled cookie dough and use your fingers or the back of a measuring spoon to press it gently onto the peanut butter layer, filling most of the cup without overstuffing it. This dough is forgiving and won't spread, so you can shape it however feels right.
- Top with chocolate seal:
- Spoon enough melted chocolate over each cup to completely cover the cookie dough and seal the whole thing, smoothing the tops with the back of your spoon so they look intentional and finished. You want a seal thick enough that you won't accidentally poke into the layers when you pick one up.
- Final chill:
- Refrigerate or freeze for at least twenty minutes, though thirty is better because it gives the layers time to set completely and bond together into one unified bite. When you unmold one, it should feel solid and pull cleanly from the paper liner.
 Save
Save I brought a batch of these to my friend's house after she'd had a rough week, and she sat on her kitchen counter eating them one after another while we talked, not saying much, just present. Later she told me that moment—the texture, the flavor, the fact that someone made something just for her—meant more than she could express. That's when these stopped being a recipe I perfected and became something with real weight.
Storage and Keeping These Fresh
These peanut butter cups live happily in an airtight container in the refrigerator for up to two weeks, though I've never had them last that long. They also freeze beautifully for up to a month if you layer them between parchment paper so they don't stick together, and honestly, eating them straight from the freezer creates an even more satisfying chocolate snap when you bite into them.
Flavor Variations Worth Trying
Once you master the base recipe, these cups become a canvas for creativity without being complicated. Dark chocolate instead of semisweet creates a sophisticated bitterness that plays beautifully against the sweetness of the peanut butter, and natural peanut butter with a bit of honey mixed in adds a deeper, more complex flavor than regular creamy peanut butter. I've also started sprinkling flaky sea salt on top of the final chocolate layer before it sets, which sounds like it shouldn't work but absolutely does.
Making Them Dairy-Free and Other Adaptations
If dairy is a concern, swap the milk in the cookie dough for almond or oat milk, and use vegan butter in both the dough and peanut butter layer—the texture changes almost imperceptibly and the flavor stays right where it should be. For a nut-free version that still feels indulgent, sunflower seed butter works surprisingly well as a peanut butter substitute and even has a slightly earthier taste that some people prefer. The most important thing is that you're making something with intention, and these adaptations prove you can without sacrificing the heart of what makes them special.
- Almond butter creates a lighter, slightly more delicate flavor if you want to experiment beyond the original.
- Add a pinch of espresso powder to the cookie dough for depth that no one will identify but everyone will taste.
- These pair perfectly with hot coffee or cold milk, making them a dessert that works in almost any moment.
 Save
Save These peanut butter cups remind me that sometimes the best recipes are born from cravings and stubbornness, the refusal to choose between two good things when you could have both. Make them once and you'll understand why they've become the thing people ask for by name.
Recipe FAQs
- → How is the cookie dough made safe to eat without eggs?
The flour is heat-treated by microwaving or baking, which eliminates harmful bacteria, making the dough safe to consume raw without eggs.
- → Can I substitute dairy ingredients for a vegan version?
Yes, almond or oat milk can replace regular milk, and you can use dairy-free chocolate to keep it vegan-friendly.
- → What is the best way to melt the chocolate without burning it?
Melt chocolate in 30-second intervals in a microwave or use a double boiler, stirring frequently until smooth to prevent scorching.
- → How long should the cups chill before serving?
Chill the cups for at least 20 minutes in the fridge or freezer for the chocolate to set firmly before enjoying.
- → Can I add flavors or toppings to customize these cups?
Absolutely! Consider sprinkling flaky sea salt, using dark chocolate for richness, or adding chopped nuts for texture.