 Save
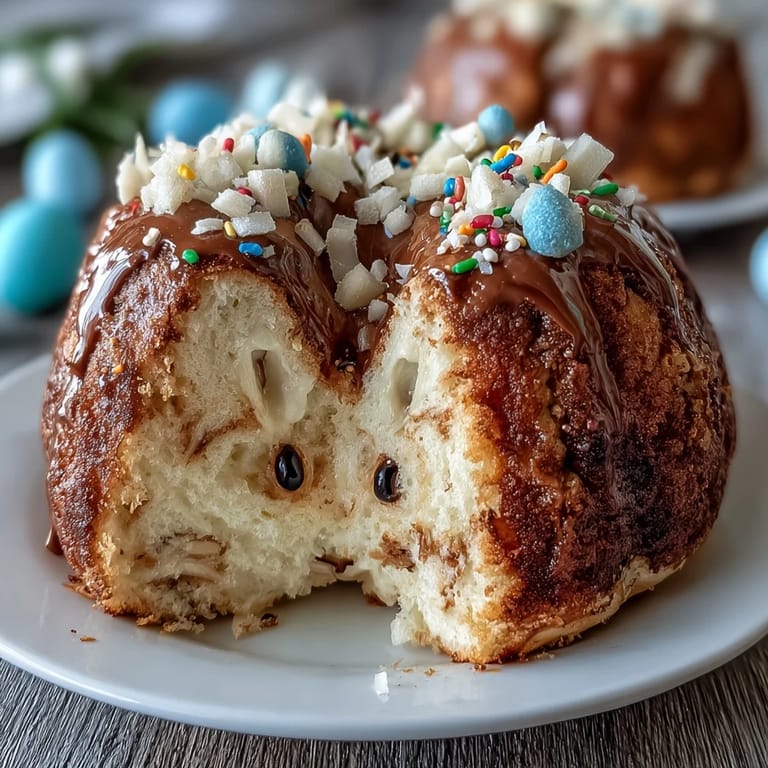
Save My sister called me in a panic the morning of Easter, asking if I could bring dessert, and somehow I said yes before thinking through what that meant. I'd seen a bunny cake online months before and tucked it away in my mind as something impossibly fancy, the kind of thing bakers with steady hands made. Standing in my kitchen with two hours until the party, I decided to just try it, and what started as pure anxiety turned into one of those rare kitchen moments where everything clicked—the cake layers came out golden, the hidden sprinkle center actually worked, and suddenly I had created something that made everyone at the table go completely silent for a second before the kids erupted. That cake taught me that whimsical doesn't have to mean complicated.
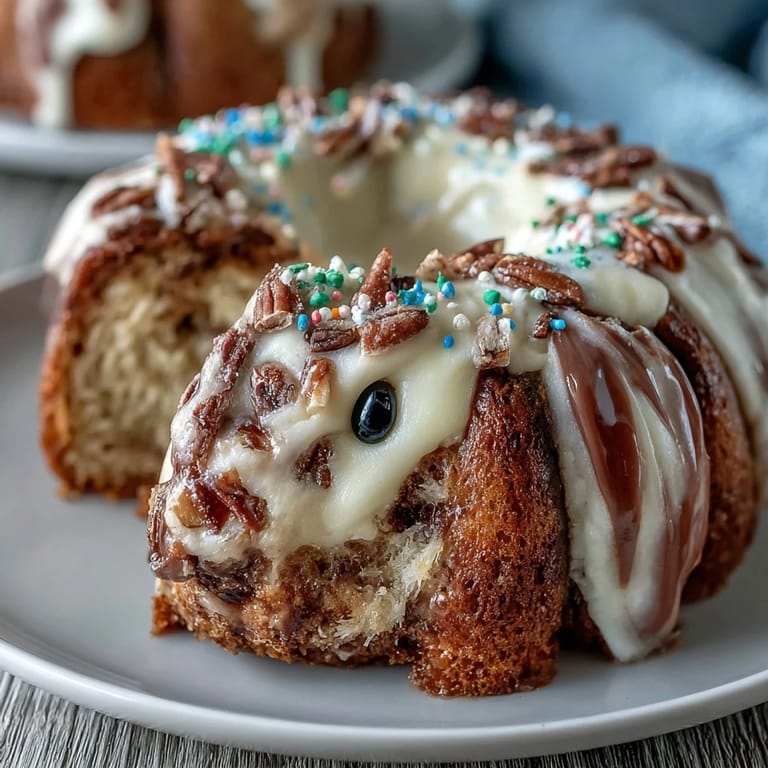
I'll never forget my nephew's face when he bit into a slice and the rainbow sprinkles tumbled out—he literally thought I'd hidden actual treasure in there. The whole table leaned in to look at the cross-section, and suddenly this cake became the thing everyone was talking about instead of just another Easter dessert. That's when I realized the hidden center wasn't just a fun surprise; it was a conversation starter, a moment of genuine delight that made the whole meal feel special.
Ingredients
- All-purpose flour: Three cups gives you structure without being heavy—you want a cake tender enough that the sprinkles inside don't crunch awkwardly when you bite through.
- Baking powder: Two and a half teaspoons is your leavening agent, creating that tender crumb that makes people close their eyes when they eat it.
- Salt: Half a teaspoon is barely noticeable but makes the sweetness sing instead of lying flat on your tongue.
- Unsalted butter: Use a full cup softened to room temperature—cold butter won't cream properly and you'll end up with a denser cake that doesn't hold decorations as well.
- Granulated sugar: Two cups beaten with butter until fluffy is what gives this cake its tender, almost velvety crumb.
- Eggs: Add them one at a time so they actually incorporate rather than sliding around in the batter looking lonely.
- Vanilla extract: One tablespoon of real vanilla matters here because there's nothing else fighting for attention flavor-wise.
- Whole milk: One cup alternated with flour keeps everything moist and helps distribute the leavening evenly.
- Assorted sprinkles: One cup for the hidden center—pick ones you actually like eating because you'll taste them.
- Powdered sugar for frosting: Four cups beaten with softened butter creates that smooth, spreadable frosting that holds the bunny shape together.
- Shredded coconut: Optional but transforms the bunny from cute to genuinely fur-like, and it adds a subtle texture contrast.
- Candy eyes and pink candies: These small touches make the bunny feel alive and worth the effort you put in.
Tired of Takeout? 🥡
Get 10 meals you can make faster than delivery arrives. Seriously.
One email. No spam. Unsubscribe anytime.
Instructions
- Heat your oven and prep the pans:
- Set the oven to 350°F and grease those pans generously with butter, then dust with flour so nothing sticks when you try to turn the layers out. This might seem like extra steps, but it's the difference between a beautiful cake and a frustrating crumbled mess.
- Combine your dry ingredients:
- Whisk the flour, baking powder, and salt together in a bowl so the leavening distributes evenly through the batter instead of creating random pockets of rise. This takes 30 seconds but changes everything about your crumb.
- Cream butter and sugar until fluffy:
- Beat them together for a good 3-4 minutes until the mixture looks pale and airy, almost like a cloud. This is where the tender crumb begins—you're incorporating air that will make the cake light instead of dense.
- Add eggs one at a time:
- Wait for each egg to fully incorporate before adding the next one, scraping down the bowl between additions. Rushing this step means you end up with a broken-looking batter that never quite comes together.
- Mix in vanilla, then alternate flour and milk:
- Start and end with flour, adding each component in thirds so everything stays emulsified and smooth. The milk keeps everything moist; the flour gives you structure—they work together.
- Divide batter and bake:
- Split the batter evenly between pans and bake for 35-40 minutes until a toothpick comes out clean, not wet but maybe with a few moist crumbs clinging to it. Your nose will tell you when they're close—that warm vanilla smell gets stronger right at the end.
- Cool properly:
- Let them cool in the pans for exactly 10 minutes so they set enough to handle, then turn them out onto wire racks to cool completely. Trying to frost a warm cake is a battle you'll lose.
- Create the hidden center:
- Using a 3-inch round cutter, cut a hole in the center of one cooled cake layer—you'll have a cake round and a cake ring. Save that center piece because you'll use it to seal the surprise inside.
- Layer with frosting and sprinkles:
- Place the intact layer down, spread a thin frosting layer, add the layer with the hole, then fill that hole with sprinkles and top with the cake round you cut out. The weight of the top seals everything in.
- Make your buttercream:
- Beat softened butter until creamy, gradually add powdered sugar to avoid a cloud of sugar in your face, then milk and vanilla until it's spreadable but still holds peaks. This frosting should feel like cool silk when you spread it.
- Assemble your bunny:
- Use one round cake as the face and cut the other into pieces for ears and decorative elements, arranging them on a large board so it actually reads as a bunny. Don't overthink the shape—crooked ears are somehow more charming anyway.
- Decorate with love:
- Coat everything in buttercream first so decorations stick, then add coconut for fur, candy eyes, pink frosting for ears and nose, and marshmallows for the tail if you're feeling it. Take your time here because this is the part people remember.
- Chill before serving:
- Refrigerate for 30 minutes so the frosting sets and the whole cake becomes stable enough to slice cleanly and reveal that hidden sprinkle center with drama.
 Save
Save There's a moment right before you slice into this cake when everyone goes quiet, anticipating something good, and that's the real magic of this recipe. The hidden center transforms a beautiful dessert into an experience, reminding us that sometimes the smallest surprises create the biggest joy.
Why the Hidden Center Works
A plain cake is just dessert, but a cake with a secret inside becomes a conversation starter, a moment of discovery. The sprinkles catch the light when the cake is sliced, creating a visual surprise that tastes as good as it looks, and that combination of anticipation plus payoff is what keeps people talking about it long after the party ends. I've learned that the most memorable desserts aren't always the most complicated—they're the ones that create a moment when everyone stops and pays attention.
Customizing Your Bunny
The beauty of this cake is that it's genuinely flexible, and you can shape your bunny however feels right based on the moment. Some years I've made tall ears with marshmallow, other times I've kept them low and added a bow tie cut from cake instead—the important thing is that it feels like your bunny, not a replica of someone else's. The decoration is where you get to be creative instead of precise, which honestly makes the whole project less stressful and more fun.
Timing and Make-Ahead Options
You can bake the cake layers a full day ahead and keep them wrapped at room temperature, then assemble and decorate the morning of your gathering—this splits the work into manageable chunks instead of trying to do everything at once. The frosting can also be made a day early and refrigerated, then brought to room temperature and re-beaten until fluffy before you use it. Breaking this into steps means you're never overwhelmed and the cake still feels fresh and impressive.
- Bake layers up to 24 hours ahead, wrapped well at room temperature to stay tender.
- Make buttercream up to 48 hours early, then re-beat it when you're ready to use it.
- Assemble and decorate no more than 8 hours before serving so the frosting stays fresh and the sprinkles stay vibrant.
 Save
Save This cake proves that you don't need to be a pastry chef to create something that feels special and looks like you put real effort into it. Make it once and you'll want to make it again, because there's something deeply satisfying about watching someone's face light up when they discover that hidden surprise inside.
Recipe FAQs
- → How do I create the hidden sprinkle center?
After baking and cooling the cake layers, cut a round hole in the center of one layer. Fill this cavity with assorted sprinkles, then cover with the cake cut-out piece to seal the colorful surprise inside.
- → What ingredients add to the bunny’s decoration?
Shredded coconut shapes the bunny’s fur, candy eyes bring personality, while pink frosting and jelly beans enhance the ears and nose for a festive look.
- → Can this cake be made in advance?
Yes, after assembling and frosting, chill the cake for at least 30 minutes to set the frosting and keep the sprinkles contained until serving.
- → Is there a variation for chocolate lovers?
Replace half a cup of flour with cocoa powder for a rich chocolate flavor without altering the method or texture significantly.
- → What tools are essential for shaping the bunny?
Two 8-inch round pans, a 3-inch round cutter for the sprinkle center and shaping, plus an offset spatula for frosting smoothness.