 Save
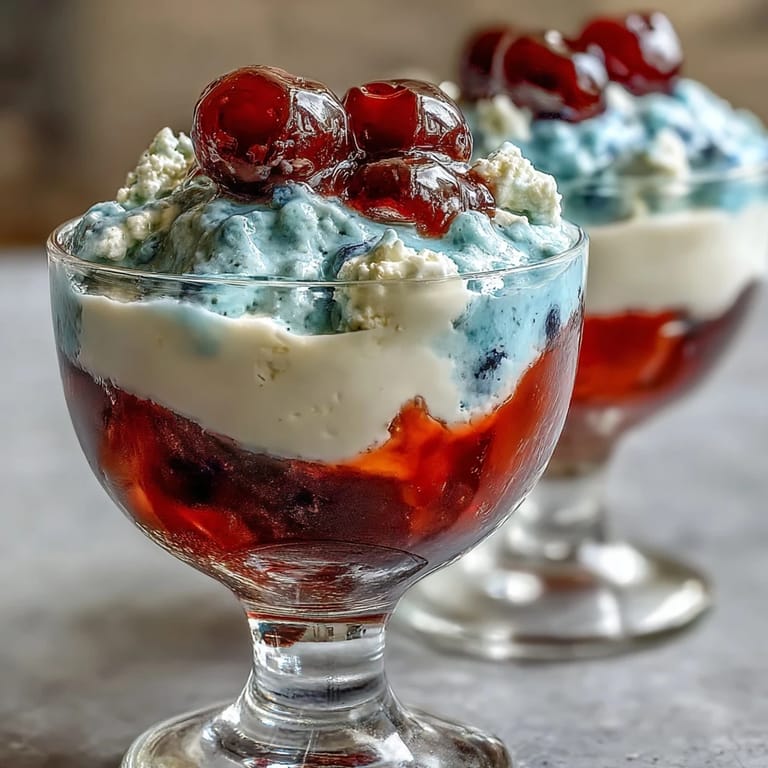
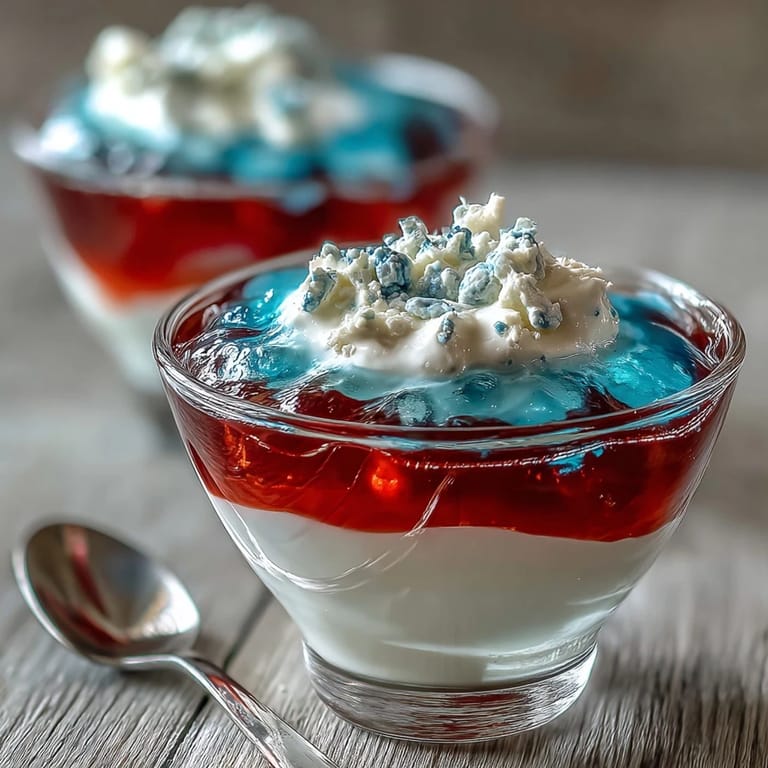
Save My daughter burst through the kitchen door last Fourth of July with a printed Pinterest picture clutched in her hand, demanding we make these layered Jello cups for the neighborhood potluck. I'd never attempted anything so deliberately architectural before, and honestly, I was skeptical about tilting cups in a muffin tin like some kind of edible science experiment. But watching those three jewel-toned layers come together—each one patient, each one worth the wait—turned what could've been fussy into something genuinely magical. The house smelled like anticipation and boiling water, and by the time we pulled them from the fridge, even I was impressed.
What really sealed this recipe for me was watching my neighbors' faces at that potluck. These cups sat in the middle of a table crowded with brownies and potato salad, but somehow everyone gravitated toward them first, drawn by those bright stripes like a dessert you could actually see through. A little girl asked if they were magic because she could see three colors at once. I realized then that food doesn't always have to be complicated to feel special—sometimes it just has to look intentional and taste good.
Ingredients
- Strawberry or cherry Jello (3 oz box): This is your bold opening statement, so pick a flavor you genuinely love because it sets the tone for everything that follows.
- Boiling water: Use fresh, fully boiling water each time you dissolve gelatin—lukewarm water won't cut it and you'll end up with cloudy layers instead of jewel-like clarity.
- Cold water: This cools down your Jello quickly so it doesn't stay liquid forever, but don't skip it thinking warm will work faster because it absolutely won't.
- Unflavored gelatin (one envelope): This is what creates that creamy white middle layer, and it needs those five minutes to bloom in cold water or it'll stay grainy.
- Sweetened condensed milk: This is the secret to a white layer that actually looks opaque and ivory instead of clear; it transforms plain gelatin into something rich feeling.
- Blue raspberry Jello (3 oz box): The finale needs to be as vibrant as the opening, so stir this one thoroughly and let it cool completely or you risk melting your white layer.
- Whipped cream and berries (optional garnish): Save these for the very last moment before serving or they'll weep into your pristine layers.
Tired of Takeout? 🥡
Get 10 meals you can make faster than delivery arrives. Seriously.
One email. No spam. Unsubscribe anytime.
Instructions
- Set up your stage:
- Arrange your eight clear cups where they can stay undisturbed during the entire process. If you're using a muffin tin to angle them for the first layer, get that ready now because you'll need it immediately.
- Create the red foundation:
- Dissolve your red or cherry Jello in boiling water, stirring for about two minutes until every granule disappears, then add cold water. Divide it equally among your cups—roughly two tablespoons per cup is perfect—and carefully position your cups at an angle in the muffin tin. This is where patience begins: refrigerate for forty-five to sixty minutes until the surface feels set when you barely touch it with your finger.
- Bloom and build the white layer:
- While your red layer sets, sprinkle unflavored gelatin over cold water in a separate bowl and resist the urge to stir; just let it sit for exactly five minutes so it absorbs the water. Pour in boiling water and stir gently until completely dissolved, then add sweetened condensed milk and let it cool to room temperature—this takes about fifteen minutes and tastes like nothing yet but trust the process. Once your red layer is firm, straighten your cups upright and slowly pour the white mixture on top, using about two tablespoons per cup, then refrigerate for another forty-five to sixty minutes.
- Top with blue brilliance:
- Dissolve your blue raspberry Jello in boiling water, stirring thoroughly because this color can settle unevenly, then add cold water and let it cool completely to room temperature. This step matters: warm Jello poured over your white layer will create a blurry middle instead of a sharp line. Once cooled, carefully pour about two tablespoons into each cup and refrigerate upright for at least two hours, though overnight is honestly better if you can manage it.
- Final flourish:
- Just before serving, top each cup with a small dollop of whipped cream if using, and scatter a few fresh blueberries or strawberries on top for color and freshness. Serve them cold and watch everyone smile.
 Save
Save There's something quietly satisfying about these cups that goes beyond how they look. They remind me that good things happen when you respect the process and don't try to rush layers that need time to set. My daughter made them again for her school bake sale, and they sold out first—apparently, patriotic Jello cups are surprisingly popular with teenagers.
The Angle Trick That Actually Works
The muffin tin method feels silly until you understand why it matters: tilting your cups during the first chilling creates a larger surface area for the red layer, which means when you add the white layer on top, you get a more dramatic stripe instead of a thin line. I've tried propping cups against the fridge wall and leaning them in bowls, but nothing beats the muffin tin because it's stable and reliably holds them at the same angle. Once your red layer sets, you straighten everything up and continue normally, but that first tilt is what makes the visual impact feel intentional rather than accidental.
Temperature Timing and Patience
This recipe teaches you that cold matters as much as hot in dessert making. Boiling water dissolves gelatin quickly and completely, but cold water cools it down to a state where it'll set without taking forever. The white layer's bloom step—letting gelatin sit in cold water for five minutes—sounds arbitrary until you skip it and end up with a grainy texture instead of smooth creaminess. Everything here moves at its own pace, and trying to speed it up just creates problems you'll have to hide under whipped cream.
Flavor Swaps and Personal Touches
Once you've made these once, you'll start seeing variations everywhere. Lime Jello works beautifully instead of blue, or you could do strawberry, white, and blackberry for a different patriotic feel. The framework stays exactly the same; only the colors and flavors change. I've seen people add a layer of crushed cookie in the middle, or tiny sprinkles suspended in the white layer, or even a thin berry coulis between the red and white. The beautiful part is that once you understand how layers work and why timing matters, this recipe becomes a canvas for whatever your occasion demands.
- Keep your Jello brands consistent because different brands set at slightly different rates and you want predictability.
- Clear cups are non-negotiable because the whole point is seeing those beautiful stripes, so don't try to improvise with frosted or colored glass.
- Make these at least a few hours ahead so the blue layer has time to fully set and you're not serving them while they're still slightly soft.
 Save
Save These layered Jello cups are proof that simple ingredients and a little patience can create something that feels fancy and celebratory. They've become my go-to when I need dessert that looks impressive without keeping me in the kitchen for hours.
Recipe FAQs
- → How do you achieve sharp layers in jello cups?
Allow each layer to fully set before adding the next to maintain distinct, sharp layers.
- → Can I substitute the sweetened condensed milk for a dairy-free option?
Yes, coconut milk with added sugar can replace the sweetened condensed milk to make it dairy-free.
- → What is the best way to chill the cups at an angle?
Use a muffin tin to hold the cups slightly tilted in the refrigerator for angled layers.
- → Are there any gluten concerns with the ingredients used?
The dessert is naturally gluten-free, but verify gelatin and condensed milk brands to avoid hidden gluten.
- → How long should the final blue layer chill before serving?
Refrigerate the blue layer upright for at least 2 hours or until fully set before serving.